展现效果:
鼠标向下滚动:
这种目前企业网站常见的头部导航效果,在elementor里面无法自动实现,有一些主题实现,但是操作还是比较繁琐,另外还有一些专门插件实现这个效果。我觉得这种简单的效果几行代码就能实现,再去搞插件有点烦,干脆就整成代码下次直接用就行。
操作如下:
1. 新建header类型的模板,条件是全局。里面插入容器,容器里插入logo和导航菜单,调整位置和logo大小。
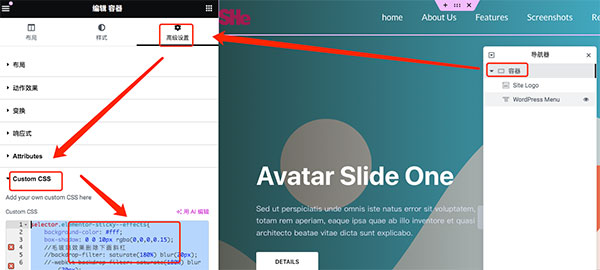
2. 选中容器,高级设置,custom css里插入css代码:
selector.elementor-sticky--effects{
    background-color: #fff;
    box-shadow: 0 0 10px rgba(0,0,0,0.15);
    //毛玻璃效果删除下面斜杠
    //backdrop-filter: saturate(180%) blur(20px);
    //-webkit-backdrop-filter: saturate(180%) blur(20px);
}
selector{
   transition: background-color 1s ease!important;
   z-index: 200;
}
selector > .elementor-container{
   transition: min-height 1s ease!important;
}
selector .elementor-nav-menu a.elementor-item{
    padding: 28px 20px;
}
selector.elementor-sticky--effects .elementor-nav-menu a.elementor-item{
    padding: 21px 20px;
    color: #000;
    fill: #000;
}
selector.elementor-sticky--effects .elementor-nav-menu a.elementor-item:hover{
    color: red;
}
位置如图:
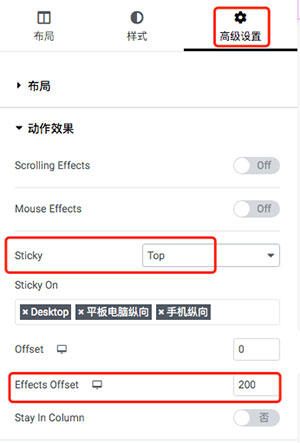
3. 继续设置头部容器的动态效果:
4. 在前台使用开发者工具查看header的高度,然后把页面内容设置 margin-top: 负值。这步请看视频 https://www.bilibili.com/video/BV14y411z7nK/
